How to use Sequentia Nexus
This guide covers version 0.46.0. Sequentia Nexus is in beta: some parts may still change.
Contents
- Install
- The main window
- Set up your folders
- Build a workflow
- Run a workflow
- The steps
- Subtitles in depth
- Preferences
- Presets
- Troubleshooting
- Where your data is stored
1. Install
Install the beta (Windows 10 / 11)
- Download
SequentiaNexus-<version>-windows.zipfrom the Releases page. - Unpack it in a folder of your choice, for example
C:\Sequentia Nexus. Everything the program needs is inside: nothing else to install, except the external programs below. - Double-click
SequentiaNexus.exe. The program is not yet signed with a certificate, so the first time Windows may show Windows protected your PC: click More info, then Run anyway. - Get your free beta key at sequentianexus.com/beta (one click and a quick "I am not a robot" check), then open Settings → Preferences → License, paste it and press Activate (see License).
To update, unpack the new version in place of the old one: your preferences, presets and license stay where they are (see Where your data is stored).
Only one Sequentia Nexus window can be open at a time: starting the program again brings the open window to the front (also when it is minimised).
System Requirements window
The app needs some external programs. The first time they are missing, the System Requirements window opens by itself. You can open it at any time from Settings → System Requirements....
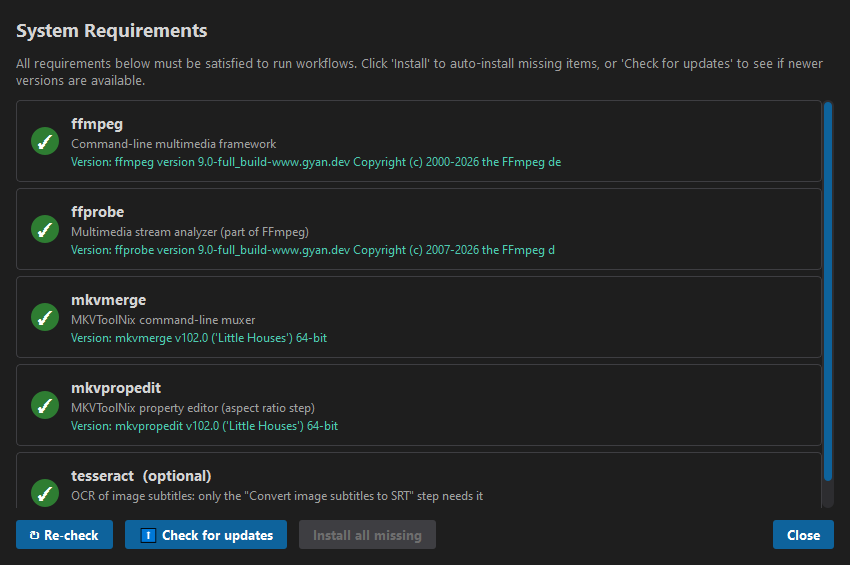
| Program | Needed for |
|---|---|
| ffmpeg, ffprobe | Reading and converting audio, video and subtitles |
| mkvmerge | Merging the final MKV files |
| mkvpropedit | The Aspect ratio step |
| tesseract (optional) | Only the Convert image subtitles to SRT step |
- A green check means the program is ready.
- Install installs a single missing item; Install all missing installs all the required ones (optional items, shown in grey, are left out).
- Check for updates looks for newer versions.
- ↻ Re-check runs the checks again.
A program installed here is found right away: you don't need to restart the app.
Workflows cannot start while a required program is missing.
2. The main window
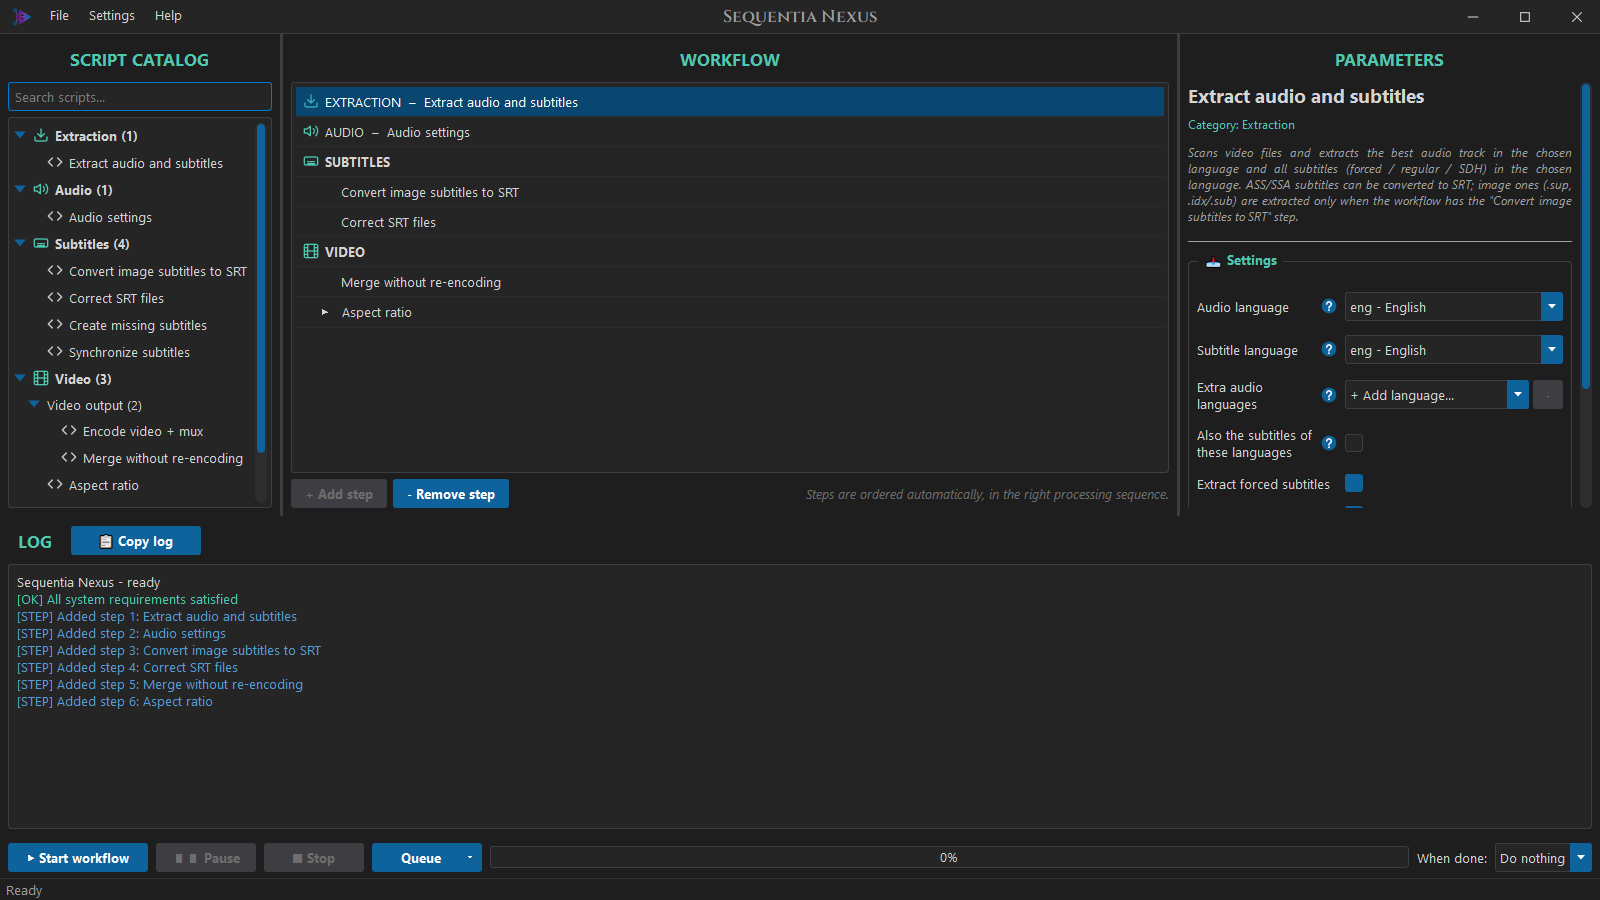
| Area | What it is |
|---|---|
| Script catalog (left) | All the available steps, grouped by section: Extraction, Audio, Subtitles, Video. Type in Search scripts... to filter them. |
| Workflow (centre) | The steps of your workflow, in the order they will run. |
| Parameters (right) | The settings of the step selected in the workflow. |
| Log (bottom) | What the app is doing, live. 📋 Copy log copies it all. |
| ▶ Start workflow / ❚❚ Pause / ■ Stop | Start, pause and stop the run. The bar next to them shows the progress; When done on the right puts the PC to sleep, hibernates it or shuts it down at the end (see Run a workflow). |
| Queue | Adds the current workflow to the queue, or shows the queue: several workflows with their own folders, run one after the other (see The queue). |
The menus:
- File: New workflow, Open preset..., Save preset as..., Delete preset..., Queue..., Exit.
- Settings: Preferences... (also Ctrl+,), System Requirements..., Theme (Dark, Light, System). The program starts in the language of Windows (English when it is not one of its languages); the language is chosen in Preferences → Language. That page always says "Language" in English too, so it can be found even in a language you cannot read.
- Help: Documentation (also F1) opens this guide in a window of its own, in the language of the program: the chapters on the left (they open on their sections), the text on the right, a search field on top, and the usual buttons to make it full screen. The guide is kept up to date from sequentianexus.com (also when there is no new version of the program) and works offline too. The same guide is on the site, at sequentianexus.com/guide. Check for updates... (see Updates), About.
3. Set up your folders
Open Settings → Preferences... → Folders before the first run.
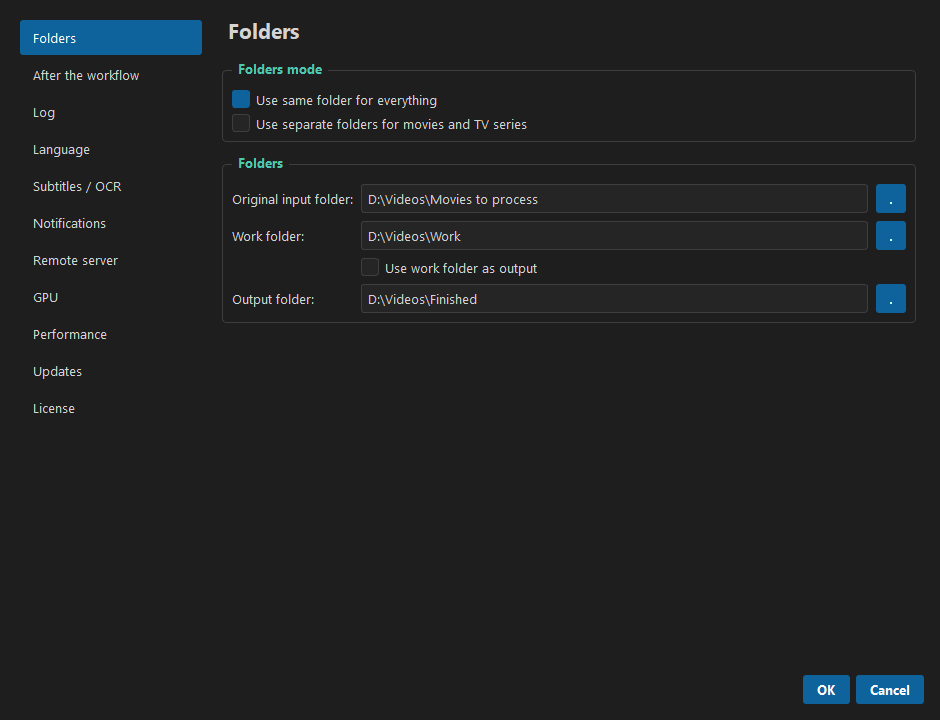
| Folder | What goes there |
|---|---|
| Original input folder | The videos to process (.mkv, .mp4, .avi, .mov). |
| Work folder | Temporary files while the workflow runs. Leave it empty to use the default folder inside the app (work). It is cleaned at the end. |
| Output folder | The finished files. Tick Use work folder as output to keep them in the work folder instead. |
The input, work and output folders must be different: the app refuses to save folders that are the same, because files could be lost.
If you never choose a work or output folder, the first time you press ▶ Start workflow the app tells you which default folders it will use (inside the program folder) and asks whether to Proceed or Cancel, so you can choose other folders first. This question is asked only once.
Movies and TV series apart
Choose Use separate folders for movies and TV series to give movies and series their own input, work and output folders. Then:
- the whole workflow runs twice: first on the movies, then on the series;
- some steps (for example Encode video and Aspect ratio) show two boxes in Parameters, 🎬 Movies and 📺 TV Series, so they can have different settings;
- if one of the two input folders has no videos, that part is skipped and the other one still runs.
4. Build a workflow
- In the Script catalog, open a section and double-click a step to add it.
- Click the step in the Workflow list and set it up in Parameters. Settings marked Advanced are for special cases: the default values are fine for most videos. Move the mouse over the blue ? next to a setting to read what it does; the explanation closes when you move away.
- Repeat for every step you need.
You don't need to think about the order. Steps are placed automatically in the right processing sequence: extraction, audio, subtitles, video output, final touches. You can add them in any order.
- - Remove step removes the selected step.
- Enable this step (at the top of Parameters) turns a step off without removing it. A step that is off is skipped, and the next steps still find the files they expect.
- Some steps work on chosen files only (for example Aspect ratio and Synchronize subtitles). Their row in the workflow opens with ▸: tick All files, or only the files you want. With separate movies and series folders you get a Movies and a Series list.
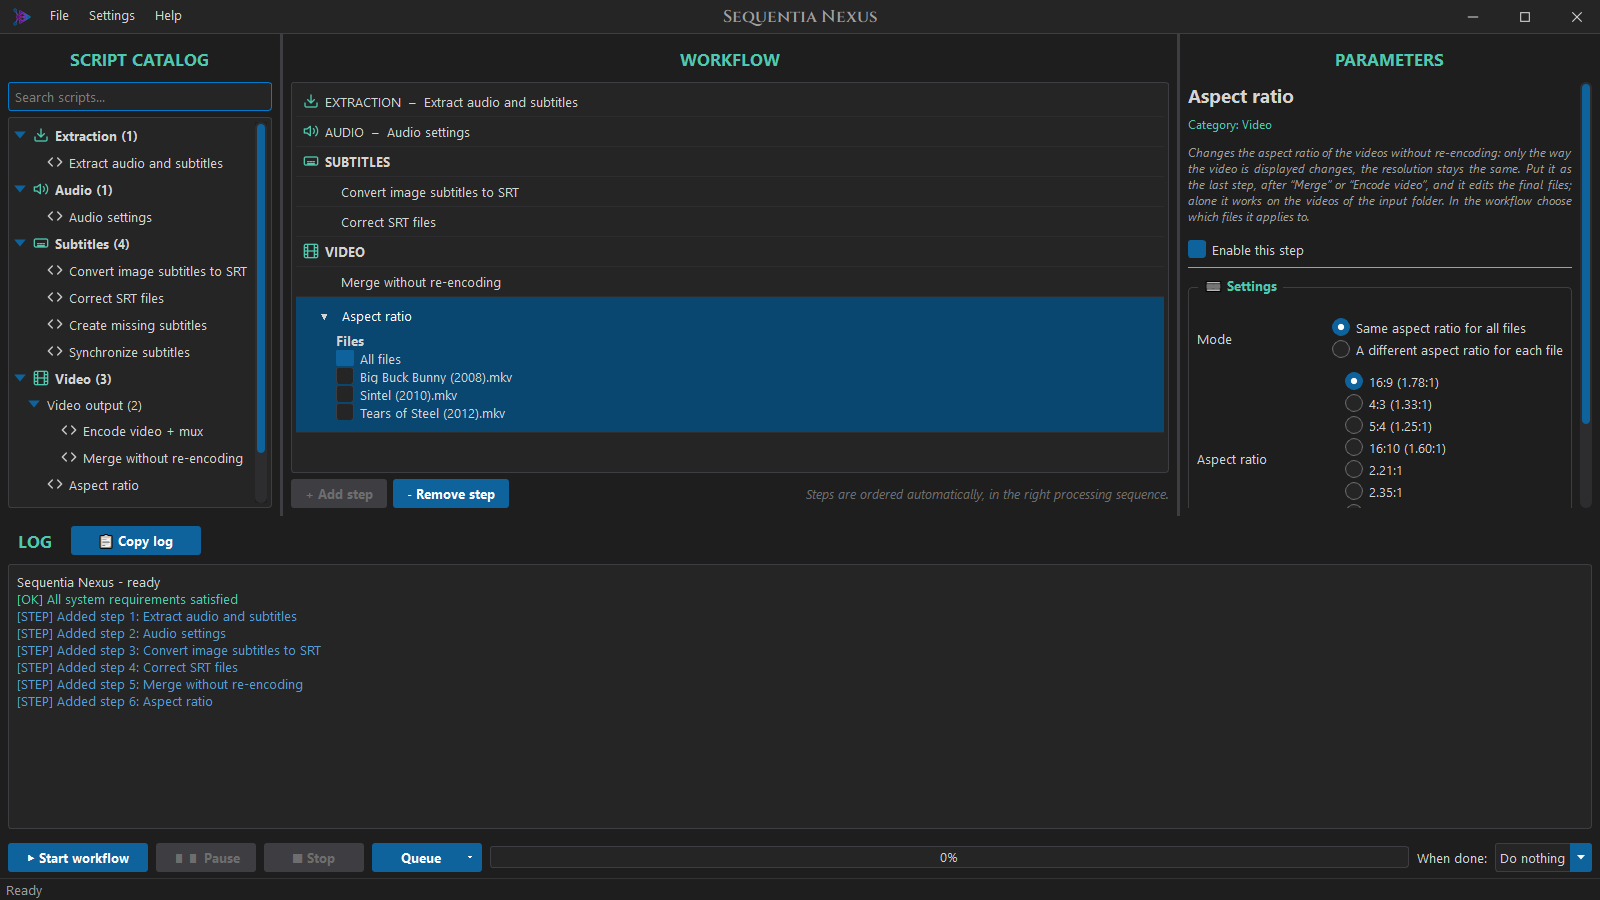
A typical workflow
| Goal | Steps |
|---|---|
| Keep the video, convert the audio to AC3 5.1, add clean subtitles | Extract audio and subtitles → Audio settings → Correct SRT files → Merge without re-encoding |
| Same, from a Blu-ray with image subtitles | add Convert image subtitles to SRT |
| Re-encode the video too | use Encode video + mux instead of Merge without re-encoding |
| Only get the audio and subtitles out of the videos | Extract audio and subtitles (alone) |
| Fix the aspect ratio of finished files | add Aspect ratio at the end, or use it alone |
5. Run a workflow
Press ▶ Start workflow. The program first checks your license with the license server (see License): this needs an internet connection. Then the log is cleared and the app checks everything before it starts:
- Errors stop the run, for example a missing program, a missing folder, a step whose input no other step produces, or an encode without a bitrate.
- Warnings let you choose: Start or Cancel. For example: some videos have no subtitles in the chosen language.
While it runs:
- Nothing can be changed: the catalog, the workflow list, the parameters (shown in grey), the presets and the Preferences are locked, so it is clear that the run uses the settings it started with. The log, the theme, About, Pause, Stop and When done stay usable.
- The workflow list follows the run: no row is highlighted; every step that is working right now shows a blue arrow that turns on its right, also two at once (for example the audio converted during the encode, or the movies uploaded while the TV series are processed). The parameters panel keeps the step you had selected, in grey. When a step ends the arrow becomes a mark: ✓ (green) done, ✗ (red) failed, – skipped (disabled step, or nothing to do), ■ stopped.
- Encode video + mux has two rows, Encode video and Mux, because it works file by file:
it encodes a video, muxes it, then goes on with the next one (with two video cards, one card
can be muxing while the other is encoding). Each row has its own turning arrow while that
phase is working on a file, and a counter of the files that finished it, for example
SERIES 3/8andSERIES 2/8; between two files a phase waits with its counter in grey. At the end both get their mark; if a file fails, the ✗ goes on the phase where it failed. With Merge without re-encoding there is one row. Next to the mark a word says what it refers to: with one folder✓ FILE(one video) or✓ FILES(more); with separate folders for movies and TV series each step has two marks, one for each pass, for example✓ MOVIES ✗ SERIES(MOVIEwith a single movie). The words are counted when the run starts; when the movies or the TV series folder is empty, only the other column is shown. The marks stay after the run, until you change the workflow or start it again. - The progress bar follows the step that is running, from 0 to 100%, and moves while each
file is being worked on: the steps report how far the conversion, the encode, the merge or the
OCR has got. The text inside the bar gives the step and the whole workflow, for example
Encode video + mux 45% · total 69%. During an encode it also gives the speed, in frames per second (added up with two video cards), and for every step the time left of that step, worked out from how fast it is going:Encode video + mux 45% · total 69% · 245 fps · 12 min left. The time left appears after the first seconds of a step and is the time of the step, not of the whole workflow (every step goes at its own speed). When the workflow ends the bar shows the whole (100%). A pass with nothing to do (Movies or TV Series with an empty input folder) does not count. - While a workflow runs, Windows does not go to sleep by itself, even if it is set to sleep after some minutes without mouse or keyboard (the screen can still turn off).
- The last line of the log shows the step that is running, with moving dots:
Convert audio in progress.... When the step ends it becomes✓ Convert audio completed (2 min 30 s), or✗ ... failedif something went wrong. Encode video + mux has two lines, one for each phase, with the files done:Encode video in progress... (3/8)andMux in progress... (2/8)(a phase waiting between two files has no moving dots). When the step ends each phase gets its own line and its own time, from its first file to its last:✓ Encode video completed (1 h 05 min)and✓ Mux completed (58 min); if a file fails, the ✗ goes on the phase where it failed. - If you scroll the log up to read it, it stays where you are; scroll back to the bottom to follow it again.
When the workflow ends, the last line of the log sums it up, in bold: how many videos were
processed and how long the whole workflow took, for example
1 movie and 3 TV episodes processed in 00:25:41 (with a single folder: 3 videos processed
in ...). If the workflow stopped or ended with errors, the line gives only the total time.
At the end the GUI also checks that every video has its final file. A video can be left
without one even when the steps end well: for example its encode failed and the encode went on
with the others, or it has no audio in the chosen language. Then the workflow ends with an
error that lists those videos, the summary says so (4 TV episodes processed, 2 not completed,
in 00:16:02), and only the originals of those videos are kept (if delete the original
files is on, the others are removed as usual). The finished files are still moved and
uploaded. To redo only the missing ones, set Existing files behavior to Skip in Encode
video and start the workflow again.
■ Stop interrupts the current step and deletes the temporary files.
❚❚ Pause freezes the workflow: the programs that are working (the step, FFmpeg, MKVToolNix,
Tesseract, also the audio converted in the background and the uploads) stop where they are and
use no CPU, and no new step starts. ▶ Resume goes on from the same point, without losing
anything; the bar says Paused in the meantime. The log notes both (Workflow resumed after 5 min
of pause), and the time of the pause does not count in the times of the steps and in the summary.
An upload to the NAS paused for a long time may lose its connection: at the resume it starts again
from where it was (the .part file), as after any dropped connection.
When done (on the right of the progress bar): Do nothing, Sleep, Hibernate or
Shut down. It can be changed also while the workflow runs, for example when you decide to go to
bed during a long encode. Hibernate saves everything to disk and uses no power, then the PC
starts again where it was (if Windows has hibernation off, the log says so: powercfg /h on turns
it on). At the end a window counts down 60 seconds, with Cancel and Sleep now / Hibernate
now / Shut down now; the log is saved and the notifications are sent before. Nothing happens if you pressed
Stop (you are there). The choice is used once, and every time the program opens it starts from
Do nothing, so the PC never shuts down by surprise. If the workflow ended with errors, its log
is saved in the log folder anyway (also with Preferences → Log off) and, when you come back (the
PC wakes up, or the next time the program opens), a message tells you and the log of that workflow
is shown again in the log panel.
A step you switched off in the workflow is skipped: the next steps use the files of the last step before it.
The queue
The queue runs several workflows one after the other, each with its own folders: for example a TV series in one folder with one preset, then a film in another folder with another preset, started in the evening with When done → Shut down.
- Queue → Add current workflow (the button next to Stop) adds the workflow shown now, with its steps, parameters and file choices, and the folders of Preferences → Folders at that moment (folder mode, input, work and output). Change the folders or the preset and add the next job: every job keeps its own.
- Queue → Show queue... (also File → Queue...,
Ctrl+Shift+Q) opens the queue window: the jobs in order, their input folders (the whole paths in the tooltip), their state (Waiting, Running, ✓ Done, ✗ With errors, ■ Stopped, – Skipped) and their result (2 videos processed in 00:12:40).- Drag a job to change the order.
- Folders... (or a double click) changes the folders of that job only.
- Load into workflow shows a job in the workflow panel: change its steps or parameters, then Use current workflow puts them back in the job (its folders stay).
- Run again puts a finished job back to waiting; Open log shows the log of a finished job; Remove and Remove finished clean the list.
- Save queue... / Open queue...: a queue file (
.snxqueue) to keep or move to another PC; opening one adds its jobs at the end.
- ▶ Start queue: first the checks of every waiting job, one after the other, with the usual pre-flight window for each job (its name in the title): all the questions (warnings, tracks without a language) are asked now, so the queue can then run unattended. A job that does not pass the checks, or that you cancel, is Skipped. Then the jobs run one at a time: the workflow panel shows the running job, the log shows its log.
- A job that ends with errors is marked ✗ and the queue goes on with the next one. Every job keeps its own log in the log folder (also with Preferences → Log off). Stop stops the whole queue: the jobs not started yet stay Waiting. Pause pauses the running job.
- At the end the last line of the log sums up the queue
(
Queue finished: 3 jobs done, 1 with errors, in 02:10:00); the notifications and When done come once, for the whole queue. - The queue is kept when the program closes; a job that was running then is Waiting again. Jobs added while the queue runs wait for the next start of the queue.
One job at a time is on purpose: a job already uses every video card (an encode on two cards) and the CPU (audio converted in parallel), and two jobs together would only slow each other down.
Where the files end up
- With Merge or Encode video, the finished MKV files go to the Output folder.
- Without them (for example only the extraction step), the audio and subtitles go to the
Output folder, one folder per video, named after the video:
Output\Big Buck Bunny (2008)\.... You get the latest version of each file, for example the converted audio and the corrected subtitles. - The work folder is cleaned at the end.
You can also have the original videos deleted after a successful run: see After the workflow.
6. The steps
Extraction
Extract audio and subtitles
Finds the best audio track in the chosen language and all the subtitles in the chosen language, and sorts the subtitles into three types:
- forced: only the on-screen writings and foreign-language lines;
- regular: the normal subtitles;
- SDH: for the deaf and hard of hearing, with sound descriptions such as
[door slams].
| Setting | |
|---|---|
| Audio language, Subtitle language | The languages to extract, for example eng - English. |
| Extra audio languages | Empty by default. Other audio tracks to keep, after the main one: see Extra languages below. |
| Also the subtitles of these languages | Off by default. Also takes the subtitles of the extra languages. |
| Extract forced / regular / SDH subtitles | Which subtitle types you want. The other subtitle steps follow these choices. |
| Convert ASS/SSA subtitles to SRT | On by default: styled subtitles (ASS, SSA, and MP4 / WebVTT text) become plain SRT; italics and bold are kept, colours, position and fonts are lost. Off: ASS and SSA stay as they are, identical to the original, and reach the final file with their style and fonts (see Fonts of ASS subtitles; MP4 / WebVTT text still becomes SRT). The SRT steps (Correct SRT, Sync subtitles, Create missing subtitles) leave an ASS unchanged, and the rules preview says so. |
| Advanced: SDH threshold, Forced: lines per minute | How a subtitle is recognised as SDH or forced when the video does not say it (see below). |
How the type is chosen, in this order:
- the title or the flag of the track: "forced", or "SDH" / "CC" / "hearing impaired";
- SDH, when many lines have sound descriptions in brackets (SDH threshold, 30 lines);
- forced, when the video has several subtitle tracks in that language and this one has less than a third of the lines of the longest;
- forced, when it has fewer lines per minute of video than Forced: lines per minute (2). A full subtitle usually has 8 to 15 lines per minute, a forced one less than 1.
The log shows the type of each track and why, for example Stream 5: regular (504 lines, 18.1
per minute).
Extra languages
With Extra audio languages a final file can have more than one audio track, for example the dubbed one and the original language. Add the languages with + Add language...; the special entry Original language takes, in each video, the track flagged as original in the file or, if no track has the flag, the first track in another language (files usually start with the original one). For each language the best track is taken, leaving out commentaries.
- The main language stays the first track and the one on by default; the extra ones follow
in the order of the list, for example
Ita AC3 5.1,Jpn AC3 5.1,Eng AC3 5.1. - A video without one of the languages comes out with the ones it has; the log says so
(
Extra audio: 'eng': no audio track in this language). - Convert audio converts them like the main track, or copies them as they are (its option Extra tracks). With Encode video + mux and the audio converted during the encode, each video waits for all its tracks before the merge.
- With Also the subtitles of these languages their forced / regular / SDH subtitles (as
ticked above) go into the file too, as they are, after the ones of the main language and never
on by default (
English forced,English regular). The subtitle steps (Correct SRT, Create missing subtitles, OCR) do not touch them; Synchronize subtitles does, like every subtitle of the video. With the hardsub they are not muxed, like the other subtitles.
Video formats. The input folder can hold .mkv, .mp4, .avi and .mov files; the
final file is always an .mkv (Film.mp4 becomes Film.mkv). Files in other video formats
(.ts, .webm, .wmv...) are skipped, and the check before the start lists them. Two files
with the same name and different extensions (Film.mp4 and Film.mkv) would give the same
final file: the check before the start stops and asks to rename one.
Tracks without a language. Many AVI and MP4 files do not say the language of their tracks. When a video has no track in the chosen language but has tracks without a language:
- one audio track (or one subtitle track) without a language is used, as if it were in the chosen language, and the final file marks it with that language. The check before the start and the log say so;
- with several tracks without a language, the check before the start asks which audio track to
use (the one the GUI would pick is already selected) and which subtitles are in your language
(none is ticked: tick the right ones, or leave them all empty for no subtitles). Each text
subtitle shows one of its lines, so you can see its language, for example
#2 · mov_text — «Why don't you just admit that you're freaked out by my robot hand?».
Audio in another language. A video may have its audio only in other languages: a film that was never dubbed in your language, or the right audio tagged with the wrong language by whoever made the file. When a video has no audio in the chosen language and no audio without a language, the check before the start lists these videos by name, and the box Audio in another language has a group for each of them. Everything chosen there applies only to that video, not to the rest of the workflow:
| Row | What it does |
|---|---|
| Process this film | Off by default: a video left unticked is skipped, as before. |
| Audio | Its audio tracks, each with its language, e.g. #1 · ger · ac3 5.1 · 448 kbps. |
| Audio language in the file | ger (as in the track) for a film that is not dubbed, or eng (workflow language) to fix a wrong tag. |
| Subtitle | None, or one of its subtitles (any language, text or image), with a line of it to recognise it. It replaces the subtitles the workflow would take for this video, and it is on by default in the final file. |
| Subtitle as | Only with Encode video + mux in the workflow: In the file, can be turned on (soft) or Burned into the picture (hard). With Merge without re-encoding the subtitle always goes in the file. |
What the subtitle steps do with the chosen subtitle:
- in the workflow language: it goes through Correct SRT files, but Create missing subtitles does not turn it into a forced one (it stays as it is);
- in another language: no step changes it;
- in both cases Synchronize subtitles applies to it, with the values of the other subtitles of the same video;
- an image subtitle stays an image (no OCR).
Videos with no audio at all are listed by name too, and skipped.
Image subtitles (Blu-ray .sup, DVD .idx/.sub) are extracted only when the workflow also
has Convert image subtitles to SRT.
AAC audio is saved as
.mka, not as a raw.aac: some AAC 5.1 tracks lose their channel layout in a raw file and become silent after merging.
Audio
Audio settings
| Setting | |
|---|---|
| Audio mode | Passthrough keeps the original audio. Custom converts it. |
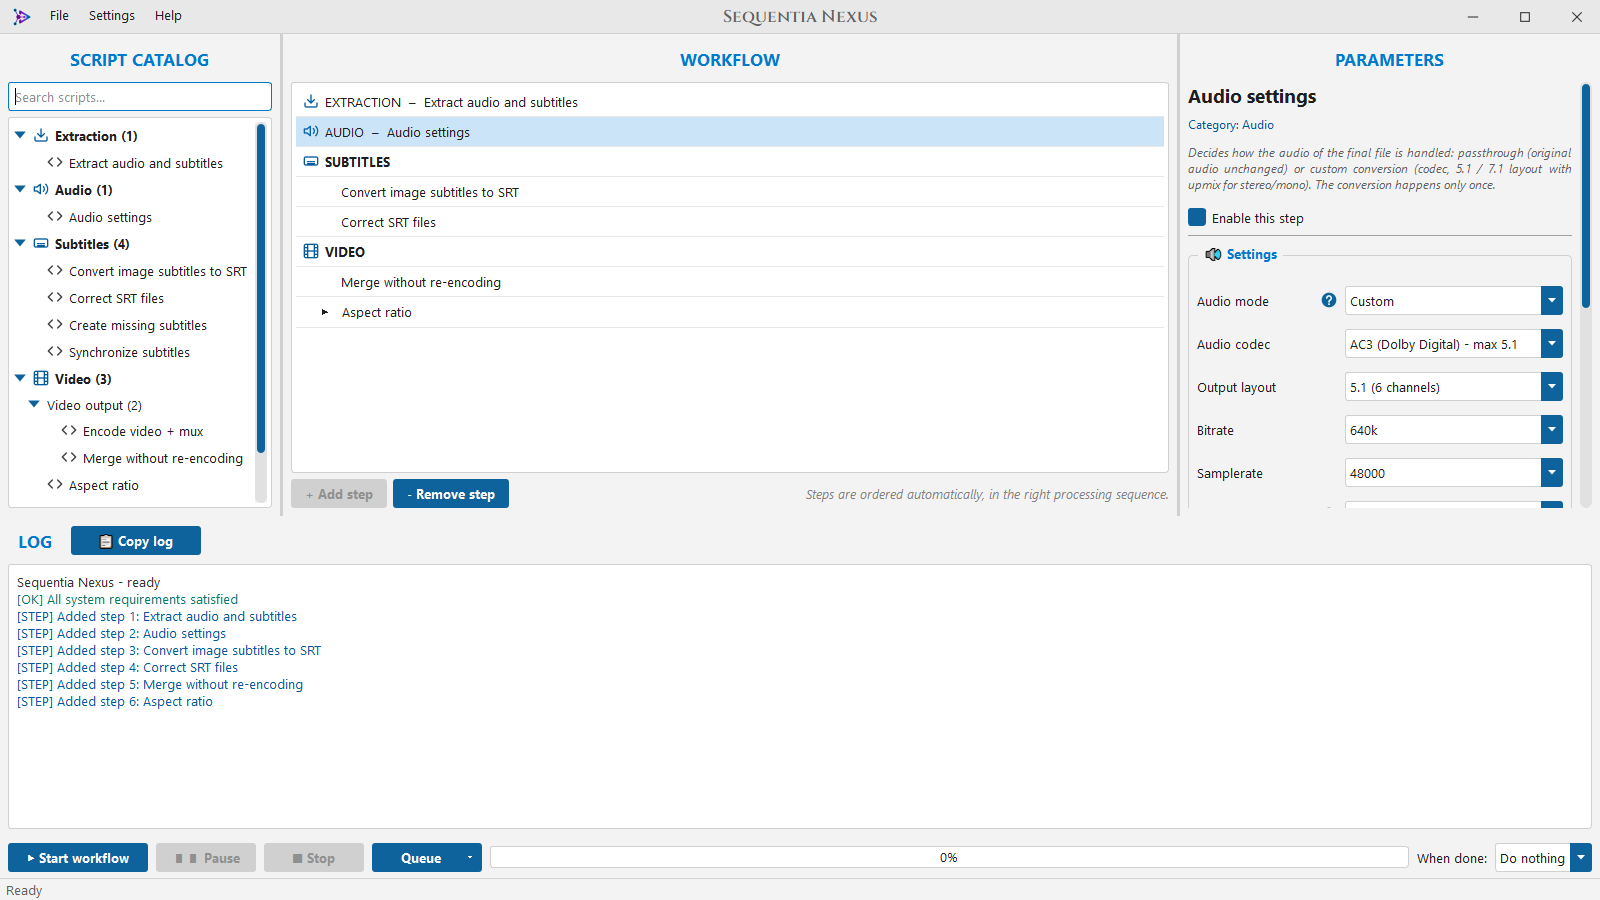
| Audio codec | AC3, E-AC3, AAC, MP3, FLAC, DTS, Opus. The maximum number of channels of each codec is in its name. |
| Output layout | 5.1 or 7.1. Stereo and mono tracks are upmixed. |
| Bitrate | Default: the maximum of the codec (AC3 640k, E-AC3 1536k...). |
| Samplerate | Default: 48000 Hz. |
| Extra tracks | The tracks of the extra languages: Like the main one (default: the same codec, channels and bitrate, files every TV can play) or Copied as they are (original quality, e.g. DTS or TrueHD, bigger files, some TVs cannot play them). |
| 5.1 surround layout | 5.1 side (recommended) or 5.1 rear. |
| Run volume check on mono files | Measures the peak of mono tracks and lowers the volume when it goes over the threshold (default -2 dB), so the upmixed audio does not distort. |
| No downmix for audio larger than requested layout | Off: a track with more channels than the codec supports is downmixed. On: the workflow stops instead. |
| Even loudness (EBU R128) | Off by default. Brings the average loudness of every file to the same level, measured as TV channels do. See below. |
| Target loudness (LUFS) | Default -23, the standard of European TV. Higher is louder: -16 is typical of YouTube and podcasts. |
| Maximum peak (dBTP) | Advanced, default -2. The limit of the peaks after the correction. |
| Parallel conversions | Advanced, default 0 = automatic. How many audio files are converted at the same time (see below). |
Even loudness is useful for TV series whose episodes are quieter or louder than the others;
films usually do not need it. It works in two passes: first it measures the audio, then it
raises or lowers the volume of the whole file by the same amount, so the dynamics (quiet
dialogue, loud explosions) stay as they are. Only if that would push the peaks over the limit,
a limiter holds back those short peaks. When it is on, the audio is always re-encoded, even if
it is already in the chosen codec, and the conversion takes about twice as long. The log shows
the measure, for example Loudness: -31.2 LUFS -> -23 LUFS (+8.2 dB).
Parallel conversions. FFmpeg's audio encoders use a single CPU core, and AAC at a high
bitrate is slow: an episode can take a few minutes. So several files are converted at the
same time, each on its own core: with 3 episodes the step takes about a third of the time, and
the files are exactly the same as one at a time. 0 = automatic uses half of the CPU threads,
at most 4; 1 converts one file at a time. In the log each line starts with the number of its
file ([2/3] Conversion -> ...).
Subtitles
These steps run in this order: OCR → Create missing → Correct → Synchronize. Each one passes all the subtitles on to the next step, including the ones it does not change.
Convert image subtitles to SRT
Reads Blu-ray (.sup) and DVD (.idx/.sub) subtitles with the Tesseract OCR and writes them
as SRT text. See OCR of image subtitles.
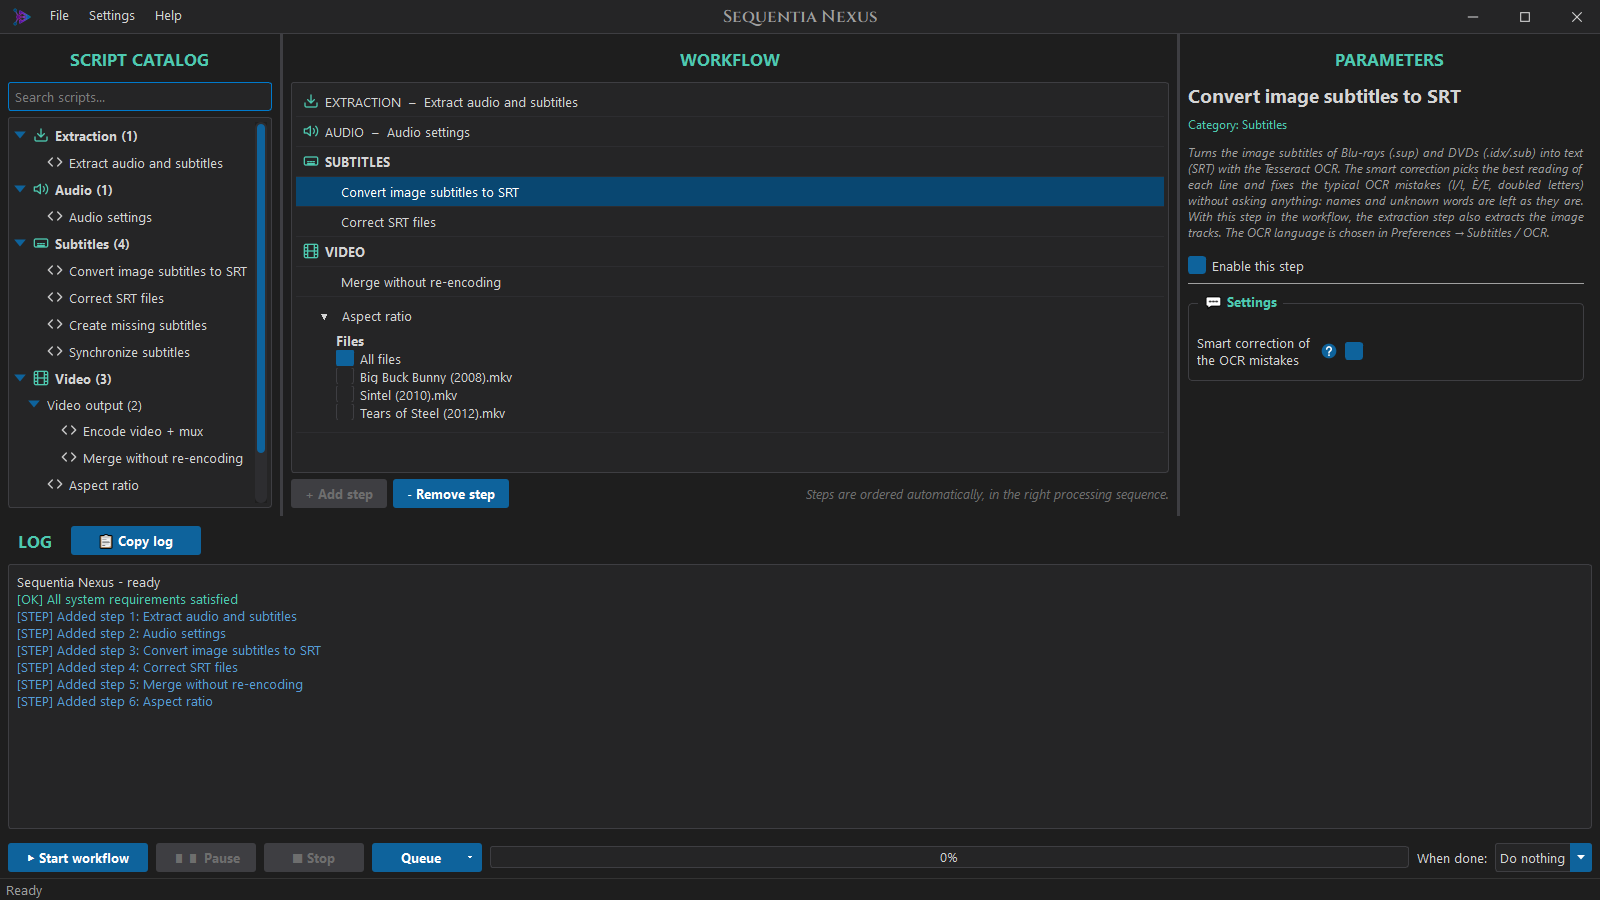
| Setting | |
|---|---|
| Smart correction of the OCR mistakes | On by default. Picks the best reading of each line and fixes the typical OCR mistakes. |
If a video already has a text subtitle of the same type, the image one is not converted. If an image cannot be converted, it is kept as it is and the log shows a warning.
The type of an image subtitle is chosen before the OCR, when its text cannot be read yet: an SDH track without "SDH" in its title looks like a regular one. After the OCR, a "regular" subtitle with many sound descriptions in brackets (the SDH threshold of Extract audio and subtitles) becomes an SDH, and Create missing subtitles then makes the clean regular from it. When SDH is not ticked in the extraction, the sound descriptions are removed at once.
Create missing subtitles
Creates the subtitle types a video does not have, from the ones it has:
- the regular from the SDH: without sound descriptions (
[...],(...)), music notes and speaker names (JOHN:,[JOHN]:,JOHN (whispering):); - the forced from the lines written in capitals (on-screen writings) of the regular, or of the SDH.
Only the types ticked in the extraction step are created, and a video that already has that type is left alone. If a video has no on-screen writings, no forced subtitle is created.
| Setting | |
|---|---|
| Create the regular from the SDH / Create the forced | What to create. |
| Advanced: Remove song lyrics (♪) | Also removes the song lines. |
| Advanced: minimum capital letters per line, % of capital letters | How a line is recognised as an on-screen writing: see below. |
How the forced subtitle finds the on-screen writings. A line counts as a writing (a sign, a caption, a title) when both conditions are true:
- it has at least 5 capital letters (minimum capital letters per line): short lines such
as
NO!orOKdo not count; - at least 80% of its letters are capitals (% of capital letters): the line is written in capitals, not a normal line that happens to contain several names or acronyms.
| Line | Capitals | Share | Forced? |
|---|---|---|---|
NO SMOKING |
9 | 100% | yes |
NEW YORK, 1985 |
7 | 100% | yes |
NO! |
2 | 100% | no: fewer than 5 capitals |
Where are Mario, Luke, Anna and Paul? |
5 | 18% | no: a normal line with names |
The FBI called the CIA. |
7 | 39% | no: a normal line with acronyms |
80% (the default) accepts a stray lower-case letter, for example an OCR mistake or
McDONALD'S. Set 100% to keep only the lines written entirely in capitals, or lower it
(down to 50%) if some signs written partly in lower case are missed. Accented capitals (È,
À) count as capitals. From a subtitle line with a writing and some dialogue, only the
writing is kept; lines without letters, such as 1985, stay too.
Correct SRT files
Cleans the subtitles automatically: HTML and ASS tags, apostrophes used as accents (e' → è,
perchè → perché), encoding errors (è → è), credits at the end, common Italian typos.
Tick Custom rules and press Edit rules... to add your own: see Custom rules.
Synchronize subtitles
Fixes subtitles that are out of sync. In the workflow row choose which subtitles it applies to.
| Setting | |
|---|---|
| Mode | The same correction for all the subtitles, or one per subtitle. |
| Convert the frame rate | For subtitles made for another edition, for example a 25 fps DVD on a 23.976 fps video: they drift further out of sync as the film goes on. The frame rate of the video is read automatically. |
| Shift the times | Moves everything later (positive) or earlier (negative), in milliseconds: 1000 ms = 1 second. |
Video
Merge without re-encoding and Encode video + mux are in the Video output group: a workflow has one or the other. Both make the final MKV: Encode video + mux encodes the video and then does the mux itself, so it needs no Merge after it. Clicking one of them in the catalog when the other is already in the workflow replaces it, and the log says so.
Merge without re-encoding
Puts the original video, the audio of the audio step and the subtitles into a new MKV, without
re-encoding. The tracks get clear names, such as Eng AC3 5.1 and English forced; the
extra languages follow the main ones. If a type
has both a text and an image subtitle, the text one is used. The attachments of the original
(the fonts of its ASS subtitles, a cover) stay in the new file; for fonts the video lacks see
Fonts of ASS subtitles.
| Setting | |
|---|---|
| Keep chapters from original | Off by default. Copies the chapters of the original video (e.g. opening, episode, ending). |
| Keep global/track tags | Copies the tags. |
Encode video + mux
Encodes the video, then merges it with the audio and subtitles like Merge does. The audio is not converted again.
| Setting | |
|---|---|
| Video codec | H.264 or H.265, on an NVIDIA GPU (NVENC, fast) or on the CPU (x264 / x265). The NVENC codecs are listed only if a card passed the NVENC test (see GPU). |
| Quality control | x264 / x265 only: Bitrate (default, predictable size) or Constant quality (CRF). See Resolution and quality below. |
| CRF | With Constant quality (CRF): Automatic (default, by the resolution that comes out) or a value from 14 to 30. |
| Video bitrate | Required: there is no default, you have to enter it (for example 4000 = 4000 kbit/s). Not needed with NVENC in VBR constant quality (CQ), or with x264 / x265 in Constant quality (CRF). |
| Not above the original bitrate | Off by default. When the original video has a lower bitrate than the chosen one, the encode uses the original one: a video downloaded from the web at 1100 kbit/s encoded at 2600k only becomes twice as big, with no gain in quality. The log says which bitrate is used, for example Original video at 1135 kbit/s, below 2600k: 1135k is used. With an H.265 original the same bitrate in H.264 is a little less sharp. Not used with CQ or CRF. |
| Two passes | x264 / x265 with a bitrate: on by default. See below. |
| NVENC preset / CPU preset | Speed against quality. |
| Bit depth | 8 or 10 bit. |
| Deinterlace | Automatic (default), Off or Always. See Picture: deinterlace, black bars, noise below. |
| Crop the black bars | Off by default. Removes the black bars of the picture (see below). |
| Maximum resolution | Same as source (default), 2160p, 1440p, 1080p, 720p, 576p or 480p. See below. |
| Noise reduction | Off (default), Light, Medium or Strong (see below). |
| HDR | Automatic (default) or Always convert to SDR. See HDR videos below. |
| Preview | Encode preview...: encodes a piece of a video with these settings and tells size, time and quality. See Encode preview below. |
| Include forced / regular / SDH subtitles | Which subtitles go into the final file (hidden with the hardsub). |
| Burn subtitles into the video (hardsub) | Off by default. See Hardsub below. |
| Subtitle to burn | Forced, regular or SDH: only the types enabled in Extract audio and subtitles. |
| Existing files behavior | Overwrite, skip, or stop with an error when the final file already exists. |
| Keep chapters from original | Off by default. Copies the chapters of the original video (e.g. opening, episode, ending), as in Merge. |
| Advanced | Rate control, CQ values, AQ, lookahead, multipass, frame rate; the style of a burned SRT (font, size, colour, black outline). |
Which card does the encode, or whether two cards encode two videos at the same time, is chosen in Preferences → GPU. There you also find two options, on by default, that make the workflow faster: the card also decodes the video, and Convert audio works while the cards encode (see GPU).
A source in 10 bit encoded with H.264 is turned into 8 bit (NVENC H.264 has no 10 bit); an HDR source is also converted to SDR (see HDR videos).
If the output folder cannot be written when a video is merged (a USB disk or a network drive
that disconnects for a moment), the encoded video is kept and the merge is tried again after
5, 15, 30, 60 and 120 seconds; the log says The output folder cannot be written (disk
disconnected?): trying again in 15 s. The same happens when Merge moves the final files.
The attachments of the original (fonts, cover) are kept in the final file, as with Merge.
Picture: deinterlace, black bars, noise
Before encoding a video the step looks at six short pieces of it (a few seconds in all, spread over the film) and prepares the picture. The log says what it found for every video.
-
Deinterlace (Automatic by default). DVDs and TV recordings are often interlaced: encoded as they are, horizontal lines appear in the movement. With Automatic:
- a progressive video (almost every Blu-ray and modern file, and most films on PAL DVD,
even when the DVD says "interlaced") is left as it is:
Deinterlace: not needed (progressive, 0% combed frames); - an interlaced video gets only its combed frames fixed, the others stay intact (like
HandBrake's Decomb):
Deinterlace: interlaced (TFF, 100% combed frames); - an NTSC film with telecine (3:2 pulldown, 29.97 fps) gets its original film frames back,
at 23.976 fps:
Deinterlace: telecine (NTSC film, 40% repeated fields).
Always deinterlaces every frame; Off never touches the picture. - Crop the black bars (off by default). Removes the black bars above and below, or at the sides: the file is smaller and the encode faster at the same quality, but the size changes, for example
Black bars: 1920x1080 -> 1920x800. Only what is black in every piece checked is removed, so a dark scene never loses picture; if the cut would remove more than half of the picture (a very dark video), nothing is cut. With the hardsub of an image subtitle (Blu-ray, DVD) the bars are kept, because those subtitles may sit in them; a burned SRT or ASS is drawn inside the cropped picture. - Noise reduction (off by default): removes the grain and noise of old videos (DVD, VHS), so the bits go to the picture, not to the noise. Light for good DVDs, Medium for grainy ones, Strong only for badly damaged sources, because it also removes fine detail. The same levels as HandBrake; the CPU does it, so the encode is a little slower. - a progressive video (almost every Blu-ray and modern file, and most films on PAL DVD,
even when the DVD says "interlaced") is left as it is:
These options exist only in Encode video + mux: Merge without re-encoding does not touch the picture.
Resolution and quality
- Maximum resolution shrinks the videos bigger than the limit, keeping their shape, after the
black bars crop: with 1080p a 4K film of 3840x1600 becomes 1920x800
(
Resolution: 3840x1600 -> 1920x800 (limit 1080p)). A smaller video is never enlarged (Resolution: 720x576, within 1080p: kept). A DVD, whose pixels are wide, comes out with square pixels when it is shrunk (720x576 at 480p becomes 854x480). With an NVIDIA card, when nothing else changes the picture (no deinterlace, crop, tone mapping, noise reduction or hardsub), the card decodes, resizes and encodes without the frames ever leaving it (Resize on the video card): faster, and the CPU stays free for the audio. A burned image subtitle follows the new size. - Constant quality (CRF), for x264 and x265: every scene gets the bits it needs for the same
quality, so easy scenes cost little and hard ones more; the size is not known in advance (the
Encode preview estimates it). Automatic uses the values of HandBrake's
presets by the resolution that comes out (after the crop and the maximum resolution): x264 20 up
to 1080p and 22 above, x265 22 and 24:
Quality: CRF 20 (automatic for 800 lines). Lower values give more quality and bigger files (every 6 points the size roughly doubles or halves). - Two passes, for x264 and x265 with a bitrate (on by default): a first fast pass looks at the
whole video, the second one encodes it giving more bits to the hard scenes; at the same size
the quality is better and the final bitrate is the chosen one (in our tests 1912 kbit/s for
2000 chosen, 2293 with one pass). The encode takes about 30-50% longer. The log says
Two passes (the first one fast)andFirst pass done: ....
HDR videos
4K films are often HDR (HDR10, HDR10+, HLG, Dolby Vision): brighter highlights and wider colours, shown properly only by an HDR TV. The step recognises them by itself (normal SDR videos do not change) and, with HDR on Automatic:
- in H.265 at 10 bit the HDR is kept as it is, with its brightness data (mastering
display, MaxCLL), as HandBrake does:
HDR: HDR10, kept (H.265 10 bit). HDR10+ and Dolby Vision (profiles 7 and 8) are kept as HDR10, their extra layer is not; Dolby Vision profile 5, which has no HDR10 picture, is made HDR10; - in H.264, or H.265 at 8 bit, HDR cannot be kept: the video is converted to SDR
(tone mapping), with natural colours and highlights, instead of the pale, grey picture an HDR
video gives when it is just re-encoded:
HDR: HDR10, converted to SDR (H.264 cannot keep HDR).
Always convert to SDR converts in H.265 10 bit too, for a file that looks right on every
screen (a PC monitor, an old TV, a phone). The conversion runs on the video card (Vulkan, fast);
where it cannot, on the CPU, slower: the log says Tone mapping on the video card failed (no
Vulkan?): done again on the CPU (slower).
A subtitle burned into a video that stays HDR (SRT or image subtitles) is made darker, at the brightness of the white of the scene: at full white it would dazzle on an HDR TV. An ASS keeps its own colours. In the Encode preview the result has an HDR line, and the frames to compare are shown converted for your screen.
Encode preview
Encode preview... (in the parameters of the step) encodes a piece of a video with the settings of the step, to choose the bitrate before starting a whole series:
- choose the video (from the input folder; with movies and TV series apart, from the folder of that section), the start (Automatic: the middle of the video, where there is usually action and not the titles; or a time) and the length (10, 30 or 60 seconds);
- Create preview encodes the piece with the same codec, bitrate, video card, deinterlace, black bars and noise reduction of the step (video only: the hardsub and the audio are not in the preview);
- the result tells the size of the whole video (video only), the speed of the encode and the time for the whole video, the picture size when the black bars are cropped and, with Measure the quality, the VMAF score: it compares the encode with the original as the eye would; from 95 the two cannot be told apart, 90 is very good, 80 good, under 70 the bitrate is too low. VMAF needs an FFmpeg built with it (the one installed by the System Requirements window has it);
- Open preview plays the piece in your video player; Compare a frame shows the same frame of the original and of the encode at real size (zoom 100-300%): the button or the space bar switches between them, so the differences in faces, dark areas and grain show.
The estimates come from the piece: an action scene needs more bits than a dialogue, so try a busy part of the film. The preview files are deleted when the window closes.
Hardsub
With Burn subtitles into the video (hardsub) one subtitle type is drawn into the picture. It shows on every player, also a TV or a phone that cannot read subtitles, but it can no longer be turned off. Only that type is used: the other subtitles are not put in the file, because a burned subtitle and others that can be turned on would overlap.
- SRT: drawn with the style of the Advanced settings. The default looks like a Blu-ray: Arial, size 20, white, a thin black outline (1.5) and a light shadow; italic and bold of the subtitle are kept. The size is the same at every resolution.
- ASS / SSA: drawn with their own style, position and fonts (to keep an ASS, turn off Convert ASS/SSA subtitles to SRT in the extraction step). See Fonts of ASS subtitles.
- Image subtitles (Blu-ray
.sup, DVD.idx+.sub): drawn as they are, no OCR needed: with the hardsub the extraction step takes the image tracks even without the OCR step. A DVD subtitle is stretched to the video (also an upscaled one); a Blu-ray subtitle made for 1920x1080 on a cropped video (1920x816) is shrunk to fit, never squashed.
A video that does not have the chosen type (you chose forced, but one episode has none) is encoded without burned subtitles, and the end of the log says so, just before the summary:
⚠ 1 video without burned subtitles (no forced subtitle): Show S01E03
4 TV episodes processed in 00:12:40
If the type is turned off in the extraction step (for example by an old preset), the pre-flight check stops the start.
Fonts of ASS subtitles
An ASS names its fonts, and an MKV usually carries them as attachments. They are used for the hardsub and stay in the final file (with Merge and Encode), so the ASS looks right on every player. When a video lacks a font its ASS needs:
- if another video of the same workflow has it (an episode of a series often lacks the font
the other episodes carry), that one is used and attached to this video too:
Font 'Snxtest' not attached to this video: taken from Show S01E01.mkv; - otherwise a font installed on the PC with that name is used;
- otherwise the text is shown with a similar font, and the end of the log says so:
⚠ Font "Nowherefont" found in no video and not installed, shown with a similar font: Show S01E03.
Aspect ratio
Changes how the video is displayed (16:9, 4:3, 2.35:1, custom...) without re-encoding: the resolution does not change. MKV files are changed in a moment.
- At the end of a workflow with Merge or Encode video, it changes the finished files.
- Alone, it makes changed copies of the videos in the input folder; the originals are not touched.
- Same aspect ratio for all files, or A different aspect ratio for each file, with a list of the files chosen in the workflow row.
Utilities
Upload to server
Uploads the finished files to a remote server, for example your NAS at home, also while you work away from home on a laptop. The server and the folders on it are set once in Preferences → Remote server; the step only has the options of this workflow. Put it in the presets where you need it.
It runs last, after the final files have been moved to the output folder, or together with the encode if Upload each file as soon as it is ready is on in Preferences → Remote server. Then:
- each movie goes to the movies folder on the server and each episode to the series folder
(with movies and series apart, from their own pass; with a single folder, an
S01E01or1x01in the name means an episode); - every file is uploaded as
name.mkv.partand renamed only when it is complete, so a media server (Plex, Jellyfin...) never sees half a film; - if the connection drops, the upload is tried again and goes on from where it stopped. A
.partleft by a stopped workflow is resumed the next time; - at the end the size on the server is checked.
If a file cannot be uploaded, the workflow ends with errors and the original videos are not deleted, even if Delete the original videos is on.
| Setting | |
|---|---|
| If the file is already on the server | Replace (the old file is replaced only when the new one is complete) or Skip. |
| Delete the local files after the upload | Off by default. After a good upload the final file is deleted from this PC, handy on a laptop. A file that was not uploaded is never deleted. |
| Attempts if the connection drops | Advanced, default 5, waiting longer each time (5 s, 15 s, 30 s, 1 min, 2 min). |
The time an upload takes depends on the upload speed of the network you are on: on a mobile connection or a hotel Wi-Fi a 5 GB film can take more than an hour. The log shows the speed of every file.
Movies and TV series on different disks. With movies and TV series apart, the movies are
processed first. If the movie output folder is on a physical disk different from the ones the
TV series use (their input, work and output folders), the movies are uploaded in the background
while the TV series are processed: reading one disk and writing another do not slow each other
down. This happens by itself, there is nothing to set. Two partitions of the same disk count as
the same disk, and so do network folders: then the upload works as before, one part after the
other. In the log the lines of that upload start with [Upload Movies]. The TV series upload
waits for the movies one to end (the server gets no more connections than set), the original
movies are deleted only after their upload went well, and the summary arrives when everything,
uploads included, is over.
7. Subtitles in depth
Subtitle file names
Inside a workflow the subtitles are named <video>_sub_<type>.<extension>, for example
Sintel (2010)_sub_forced.srt. In the final MKV each type becomes its own track, with the
forced flag on the forced one.
Custom rules
Correct SRT files → Custom rules → Edit rules... opens the rules window.
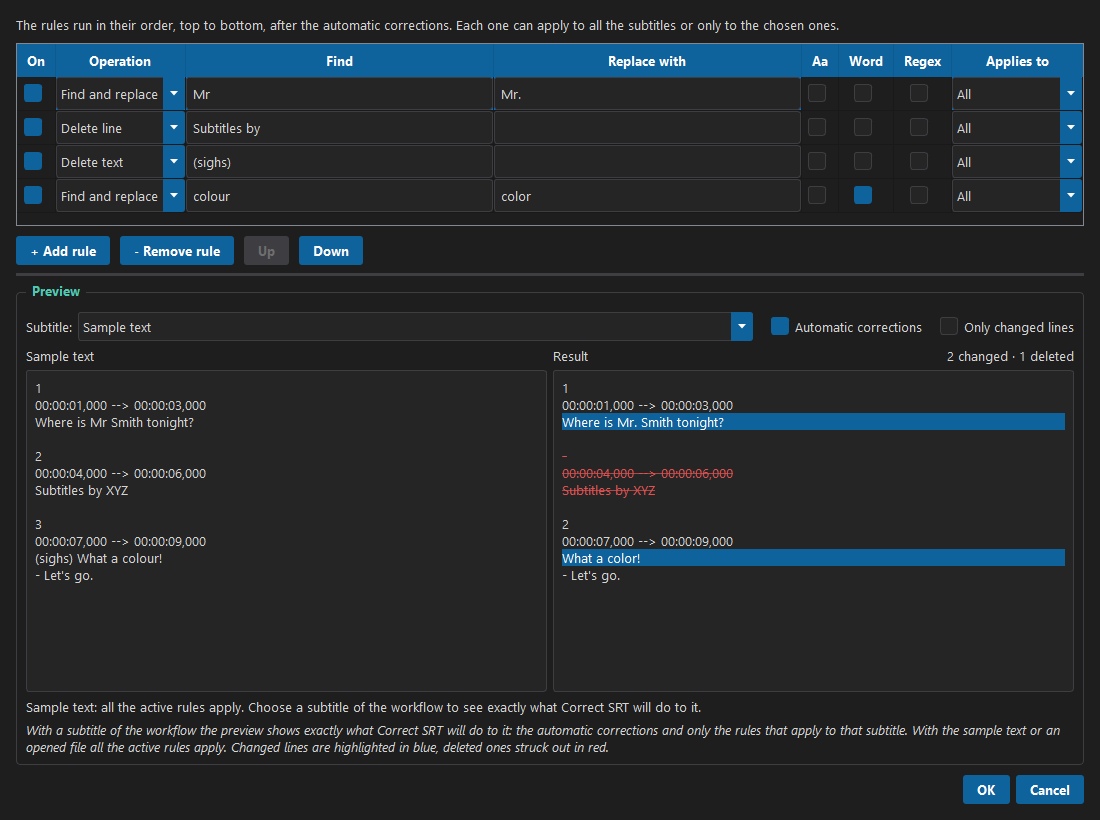
Every rule is one row:
| Column | |
|---|---|
| On | Turns the rule on or off. |
| Operation | Find and replace, Delete text (removes only the text found), Delete line (removes the whole subtitle line, times included). |
| Find / Replace with | The text. |
| Aa | Match case. Without it, the replacement follows the case of the text found: Perchè → Perché, PERCHÈ → PERCHÉ. |
| Word | Whole words only: sig does not match signal. |
| Regex | Regular expression, for expert users. \1, \2 in the replacement are the groups. |
| Applies to | All the subtitles, or only the ones you tick in the list (=== MOVIES === / === TV SERIES ===). |
The rules run from top to bottom, after the automatic corrections. Use Up and Down to change their order. The window can be maximised; drag the bar between the table and the preview to resize them.
Preview
The preview shows the result live: changed lines in blue, deleted ones struck out in red, and a count such as 2 changed · 1 deleted.
In Subtitle: choose what to test the rules on:
- Sample text: an example you can edit. All the active rules apply.
- A subtitle of the workflow: the app takes it from the video, exactly as the extraction step will, or creates it as Create missing subtitles will. The preview then shows exactly what Correct SRT files will do to it: the automatic corrections (tick Automatic corrections) and only the rules that apply to that subtitle. It takes a few seconds for a big file; videos with only image subtitles are read with the OCR (about a minute).
- Open file...: any SRT file on your disk.
Tick Only changed lines to see just what changes.
OCR of image subtitles
Blu-rays and DVDs often have subtitles stored as pictures. The step Convert image subtitles to SRT reads them and turns them into text.
Before the first use:
- Install Tesseract from Settings → System Requirements.
- Open Settings → Preferences → Subtitles / OCR and download the language of your subtitles (Download: a few seconds).
How accurate it is. Every line is read twice, as a whole and line by line, and the smart
correction keeps the reading with the most real words. It then fixes the typical OCR
mistakes, such as I / l / 1, rn / m, missing accents, and in Italian Io / lo,
Il / II, È / E, but only when the result is a real word or a name used in the same
subtitle. Names and words it does not know are left as they are, and it never asks questions.
Typos that were already in the original subtitle are kept.
On the test files: a DVD 40 lines out of 40, an English Blu-ray 29 out of 30, a TV series about 99.5%. Italic text is the hardest part: a quick look at the result is always a good idea.
Speed. The OCR uses one CPU core per process. In Preferences → Subtitles / OCR → Speed choose how many processes run together: Automatic uses all the cores but one, at most 8. If you are encoding at the same time, choose a low number, for example 2.
8. Preferences
Settings → Preferences... has one page per topic, listed on the left.
Folders
See Set up your folders.
After the workflow
When a workflow finishes, the original videos can be:
- deleted permanently, or
- moved to the Recycle Bin.
Only the videos processed in that run are removed, and only if their finished file exists (or was uploaded to the server and then deleted from this PC by Upload to server). If some videos fail, only their originals are kept and the others are removed. Nothing is removed if the workflow is stopped or has other errors (for example a failed upload).
Language
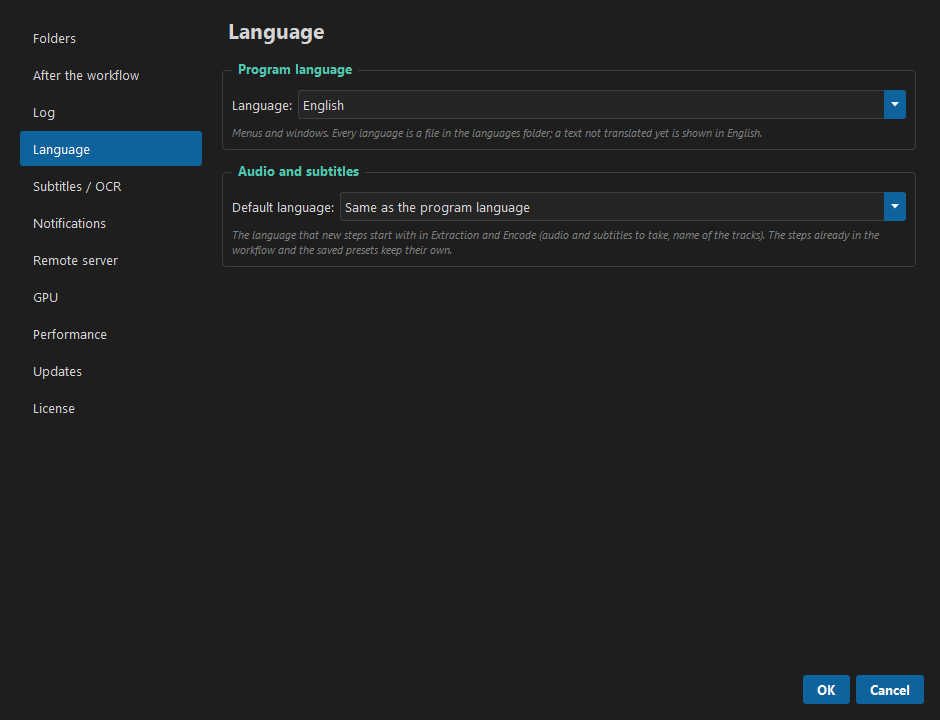
- Program language: the language of menus and windows: English, Italiano, Français,
Deutsch, Español, Português (Portugal), Português (Brasil), Română, Русский, Türkçe, 简体中文. Each language is a file in the
languagesfolder of the program; a text that is not translated yet is shown in English. The translations other than English and Italian are new: if you find a mistake, please open an issue. At the very first start the program uses the language of Windows, when it is one of these (otherwise English); after that, the language chosen here. - Audio and subtitles → Default language: the language that new steps start with in
Extract audio and subtitles and Encode video (which audio and subtitles to take, and the
language written on the tracks of the final file). Same as the program language is the
default: with the program in English new steps start with
eng. The steps already in the workflow and the saved presets keep their own language. Languages with two codes (for example Germanger/deu, Frenchfre/fra) are recognised with either.
Log
- Save the log of every workflow to a file: off by default. The log is saved also when the workflow fails or is stopped.
- Maximum number of saved logs (1–500, default 30): when it is reached, every new log deletes the oldest one.
- Open logs folder opens the folder of the saved logs.
Subtitles / OCR
| Setting | |
|---|---|
| OCR language | Same as the subtitles of the extraction step (default), or a fixed language. Download / Remove manage the languages on your PC. |
| Tesseract | Where Tesseract was found. Leave Path empty unless you installed it in an unusual place. |
| Parallel OCR processes | See Speed. |
Notifications
Both are off by default.
- Show a notification when a workflow ends: a message in the corner of the screen (Windows notifications) says whether the workflow was completed, finished with errors or was stopped, with the preset and how long it took. If the window is not in front, its button on the taskbar also flashes.
-
Send a Telegram message when a workflow ends: the same message on your phone, handy for long encodes. To set it up:
- In Telegram, open @BotFather, send
/newbotand follow the steps: at the end you get the token of your bot. - Open your new bot and send it any message.
- Paste the token in Bot token and press Find chat ID.
- Press Send a test message to check.
The token is saved only on your computer, in the preferences. If a message cannot be sent (no internet, wrong token), the log says so; the workflow is not affected.
- In Telegram, open @BotFather, send
Remote server
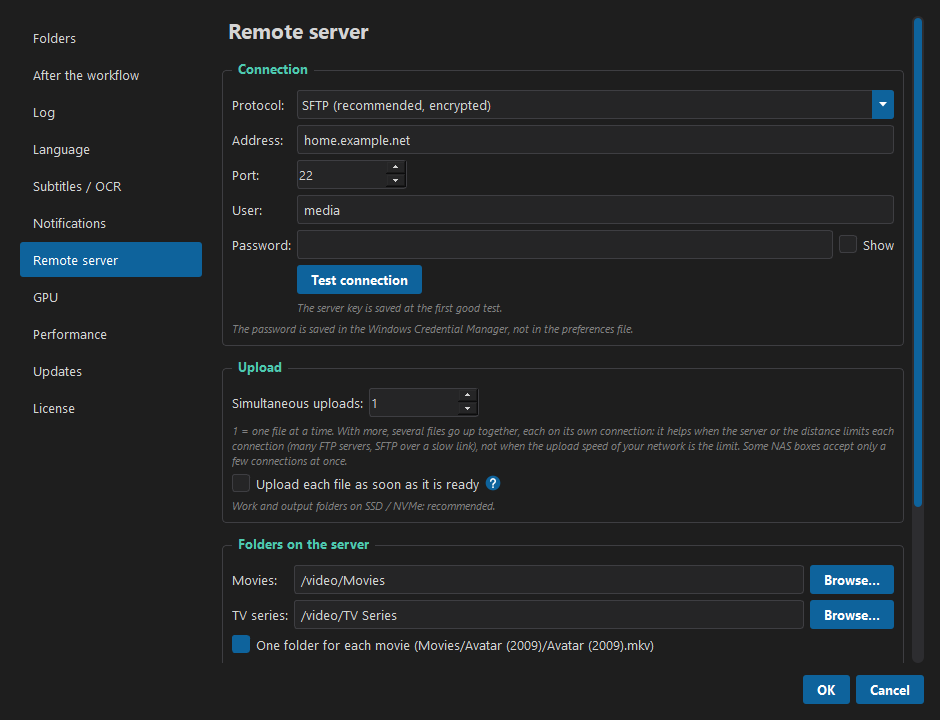
The server used by the Upload to server step.
Connection
- Protocol: SFTP (recommended: encrypted, offered by almost every NAS), FTPS (encrypted FTP) or FTP (not encrypted: the password and the files travel in clear, so use it only at home or through a VPN).
- Address and Port in two fields: the IP address or name of your home connection (for
example a dynamic DNS name such as
home.ddns.net), and the port opened on the router for the NAS. The port changes to the usual one (22 or 21) when you change the protocol. - User and Password of the NAS. The password is saved in the Windows Credential Manager, not in the preferences file.
- Test connection connects and shows the home folder on the server. With SFTP the first good test also saves the server key, which is checked at every later connection: if another computer answered at that address, nothing would be sent. After a reset of the NAS the key changes, and the app asks whether to accept the new one.
To reach the NAS from outside, its port has to be opened on the home router (with a dynamic DNS name if your home IP address changes), or you can connect through a VPN (Tailscale, WireGuard, the one of the router or of the NAS). A VPN is safer: nothing is exposed to the internet.
Upload
- Simultaneous uploads (1 to 5, default 1): how many files go up at the same time, each on its own connection. It helps when each connection is limited by the server (many FTP servers do it) or by the distance (SFTP over a slow link); it does not help when the limit is the upload speed of the network you are on, because the files then share it. Some NAS boxes accept only a few connections at once: when the server refuses one, the log says so and that file tries again as soon as another one is finished.
- Upload each file as soon as it is ready (off by default): the upload starts together with
Encode video + mux (or Merge without re-encoding): each file goes up as soon as it is
finished, while the others are still being encoded. With a series, when the last episode is
ready the first ones are already on the server. The original videos are still deleted only
at the end, if everything went well. With Aspect ratio in the workflow the files are
changed after the encode, so they are uploaded at the end. In the log the lines of the
upload start with
[Upload]. Under the box the page checks the disks of your work and output folders: on SSD / NVMe it is recommended; on a mechanical, USB or network disk it is not, because writing one file while another is read for the upload can be too much for an older disk.
Folders on the server
- Movies and TV series: the destination folders. Type them, or press Browse... to choose them on the server (press Test connection first).
- One folder for each movie:
Movies/Avatar (2009)/Avatar (2009).mkv, as Plex and Jellyfin like it. - Series sub-folders: none (all the episodes in the series folder), one folder for each
series (
Tulsa King/), or series and season (Tulsa King/Season 04/). The season folder can be calledSeason 04,Stagione 04orS04. The series name and the season are taken from the file name, and the folders that are missing are created on the server.
An example under the options shows where a movie and an episode will go.
GPU
At the first start the app detects the NVIDIA video cards and tests NVENC on each of them (H.264 and H.265, about one second). The result is saved, so later starts only count the cards; if the number changes (a card added or removed), the app asks whether to detect them again. Detect again does it at any time, for example after a driver update.
The page lists the cards with the result of the test, and offers only what they allow:
| Cards found | Choices |
|---|---|
| None with NVENC | Nothing to choose: Encode video uses the CPU (x264 / x265), and its NVENC codecs are hidden. |
| One | Nothing to choose: that card is used. |
| Two or more | GPU 1 only, GPU 2 only... or All in parallel: one video per card. |
In parallel, each card encodes a different video at the same time, and takes the next one
as soon as it is free: with a series the encode takes about half the time. The log shows which
card each line belongs to ([GPU 2] Processing: ...) and the bar adds up the progress of both.
The other steps still work one file at a time (except Convert audio, which converts up to
four files at once), because they mostly copy data and would only slow each other down on the
same disk. The disk is not a bottleneck for an encode: even two encodes read only a few MB per
second.
Speed (both on by default, with the NVENC codecs):
- Decode the video with the card. The card that encodes also reads (decodes) the original video, instead of the CPU. The encode is as fast and the frames are the same (checked on H.264, H.265 10 bit, VP9; DVD MPEG-2 differs by invisible rounding), but the CPU stays free: in the tests, two encodes went from 71% to 35% of the CPU. A video the card cannot decode is encoded again with the CPU, and the log says so.
- Convert the audio during the encode. The cards cannot encode audio: every audio encoder
runs on the CPU. Without this option the CPU converts all the audio first, while the cards
wait, and then the cards encode while the CPU has little to do. With it, Convert audio
starts in the background and the next steps go on: while the cards encode the videos, the
CPU converts the audio. Each video waits for its own audio only before the final merge (the
log says
Waiting for the audio conversion of this file...when it has to). The lines of the audio start with[Audio]. In the tests (4 episodes of 10 minutes, AAC 512k 5.1, H.264 NVENC p7 on two cards) the workflow went from 3 min 50 s to 2 min 53 s; the longer the encode, the more of the audio time is saved. If the audio stops with a blocking error, the encode is stopped too.
Disks. Before every run the app checks the kind of disk of the work folder. If it is a USB disk, a mechanical disk or a network folder, a note in the log says that the steps that copy files (extraction, merge) will be slower. It is only a note: nothing is blocked.
Performance
Priority of the workflow: Low (recommended) or Normal. With Low, when the PC is free the workflow is just as fast; when you use the PC at the same time (browser, videos, games) Windows gives it the precedence, so it stays responsive and the workflow slows down only a little. It applies to the steps and to the programs they start (FFmpeg, MKVToolNix, Tesseract); the encode on the video card is not affected.
The page also reminds that while a workflow runs Windows does not go to sleep by itself: to put the PC to sleep, hibernate it or shut it down at the end, use When done next to the progress bar.
Updates
When the program starts it looks for a newer version on sequentianexus.com (Check for updates when the program starts, on by default): at most once every 6 hours, and only the version number is read, nothing about you is sent. When there is one, a window tells the new version, the size of the download and has a link to what's new:
- Download downloads the zip into your Downloads folder, with a progress bar (the same button cancels); then Show the file opens the folder. To update, close the program and unpack the zip in place of the old folder: your settings, presets, queue and licence are in your data folder (see Where your data is stored), so they stay.
- Later asks again at a later start; Skip this version does not tell you about that version any more (a newer one is announced again).
Nothing is ever installed by itself. A check that finds a new version while a workflow or the queue runs waits for the end of the work. Check now on this page, or Help → Check for updates..., checks at once (also for a skipped version).
License
During the beta the license key (SNX-XXXXX-XXXXX-XXXXX-XXXXX) is free: get it at
sequentianexus.com/beta (the page Preferences → License
has the link too), paste it in Preferences → License and press Activate.
- The page gives one key a day and a few keys in all to each connection, and a limited number of keys a day in all: when today's keys are finished, it asks to come back tomorrow.
-
Abuse of the page (many requests in a short time) bans the connection for life and revokes every key it received.
-
One license, one PC. If the license is already active on another PC, the app asks first: if you confirm, it moves to this PC and the other PC can no longer use it. To change PC, just activate the license on the new one (or press Deactivate on this PC on the old one first).
- Internet is needed to start a workflow. The steps are not inside the program: they come from the license server, encrypted for your license, and the key to open them is given at every start. They are downloaded once per version and kept in a cache. A workflow that is already running always finishes, even if the connection drops.
- Only a code calculated from your PC is sent to the server, never names, files or other data of the PC.
- Keep the PC date and time correct: the reply of the license server is checked, and a wrong date can make the check fail.
9. Presets
A preset saves the whole workflow: the steps, their settings, and whether each one is on or off.
- File → Save preset as... saves it with a name.
- File → Open preset... loads it.
- File → Delete preset... removes it.
- File → New workflow starts from an empty workflow.
The files chosen in a workflow row (for example for Aspect ratio) are not saved in the preset, because they change from one folder to the next.
10. Troubleshooting
| Problem | What to do |
|---|---|
| The license server cannot be reached | Check the internet connection: it is needed to start a workflow. |
| Too many requests to the license server | Wait a few seconds and press Start workflow again. |
| This license has been activated on another PC | The license was moved to another PC. To use it here, activate it again in Preferences → License (the other PC loses it). |
| Start workflow shows errors | Read the list: each error says what to fix. Missing programs are installed from Settings → System Requirements. |
| The folder window takes a few seconds to open the first time | That is Windows loading it. The mouse pointer shows that it is busy, and the window comes to the front when it is ready. |
| The final file has no subtitles | Check the log: the video may have no subtitles in the chosen language, or only image subtitles without the OCR step in the workflow. |
| OCR step: the language is not downloaded | Preferences → Subtitles / OCR, choose the language, Download. |
| The OCR slows down an encode | Lower Parallel OCR processes to 2. |
| Encode video: no video card can use H.264 NVENC | The card was not found or failed the NVENC test: update the NVIDIA driver and press Preferences → GPU → Detect again, or choose x264 / x265. |
| Upload to server: press Test connection | With SFTP the server key is saved at the first connection: open Preferences → Remote server and press Test connection. |
| The upload says the server does not answer | Check address and port, and that the NAS can be reached from outside (port open on the router, or the VPN connected). |
| No audio track found for languages ['eng'] | The video has no audio in the chosen language, and no audio without a language: check its tracks, or choose its language in Extract audio and subtitles. If its audio is only in another language, tick Process this film in the box Audio in another language before the start. |
| video(s) not completed at the end of the workflow | Read the lines of those videos in the log. To redo only them, set Existing files behavior to Skip in Encode video and start the workflow again: the finished videos are skipped. |
| Subtitles drift out of sync as the film goes on | Use Synchronize subtitles → Convert the frame rate. |
| Something else | Press 📋 Copy log and open an issue with the log and the list of steps. Issues are public: remove from the log the address, port and user name of your server first. |
11. Where your data is stored
On Windows, in %APPDATA%\SequentiaNexus\:
preferences.json |
Your preferences |
presets\ |
Your presets |
logs\ |
The saved logs, if turned on |
ocr\ |
The downloaded OCR languages |
requirements.json |
The last requirements check |
license.json |
The license activated on this PC (the activation is protected by Windows) |
steps\ |
The steps received from the license server, encrypted |
queue.json |
The queue of jobs |
guide\ |
The user guide downloaded from the site |
Deleting the app folder does not remove this folder: delete it by hand if you want a clean start.